Tag: Guide

  • How To Get Rid Of Waterbugs? 2024 – Complete Guide

    How To Get Rid Of Waterbugs? 2024 – Complete Guide

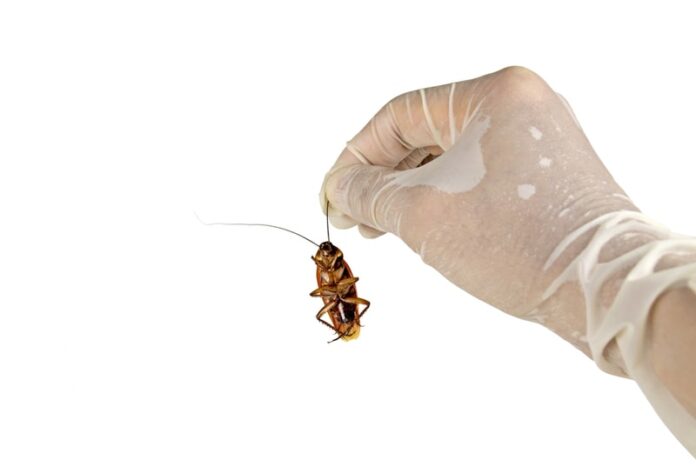
    Oriental cockroaches, giant water bugs, backswimmers, or the toe biters are common insects we find in and around stagnant water. Such bugs categorize themselves under the group of waterbugs that are now becoming a menace in every household.

    Swatting a single roach isn’t going to solve your problem if there is a possible infestation. If you think these bugs are getting into your toes every now and then, here are a few tips on how to get rid of waterbugs.

    Are water bugs dangerous?

    In simple words, not at all. These pests are not directly troublesome to us, but their presence in our homes and offices is. Outer water bugs and roaches don’t directly attack and bite humans, but they naturally sting if distributed. Their sting might cause local swelling, redness, and slight irritation.

    Moreover, as they live in colonies, they make their nests in unreachable places and spread around our houses, littering the area. The more bugs and pests are, the more are the chances of bacterial infections. Roaches and flying bugs can easily contaminate our food and supplies, directly affecting us. Thus, it is due to this unhygienic issue we consider getting rid of waterbugs.

    Spotting the presence of waterbugs

    Spotting the presence of waterbugs
    Source: prevention.com

    Before choosing a repellent or any procedure to wipe off the bugs, you should figure out the extent of the infestation and where they are dwelling.

    • Waterbugs like humid places. You can check below the sinks, behind the cabinets of the kitchen and bathrooms, and near the windows.
    • As water attracts them the most, look for the openly collected water around your property. It can be animal bowls, garden ponds, fancy fountains, or open swimming pools. You can also check for leaking pipes or open drains as the foul odor and moist places are their sure-shot nests.
    • Inside the home, look for their eggs, littered food particles, and droppings all around to ensure the bugs are roaming.

    Quick Home Remedies

    How To Get Rid Of Waterbugs
    Source: pinterest.com

    DIY solutions and home remedies are our instant choice to act fast soon as we spot the bugs. They are safe to use around the house without troubling anyone with irritation or allergies. You can choose among the following water bug killers that are available around your kitchen.

    Boric acid

    Sprinkling the boric acid powder on the most probable humid spots or the nests of the bugs kills them with irritation and dehydration as they eat away the powder. You can simply sprinkle the powder and clean the surface later. To attract more roaches and bugs, you can mix it with flour or sugar to set up bait.

    Vinegar

    It is a natural acid that irritates and kills bugs. To spray the solution on the damp and dank areas, make a solution of one part vinegar and three parts water. You can also add apple cider vinegar to create an inviting essence, thus attracting the lot immediately. You can also mix the solution with detergent to aggravate the heat and acidity.

    Essential oils

    The strong odor of different oils is famous for repelling and sometimes killing waterbugs. You can use the strongest like peppermint, rosemary, or eucalyptus oil that are capable of killing. Mild ones like Tea tree, cedarwood, and cypress oils can repel them. Dilute the oil with water, adding at least ten drops of the oil to 30mL of water. You can mix vinegar, baking soda, or other oils to increase the effect.

    Baking soda

    Baking sodaBaking sodaBaking sodaBaking soda releases carbon dioxide the moment bugs try to eat it. Soda also dehydrates and damages the exoskeleton of the waterbugs, killing them. You can simply spread the powder with a brush or sprinkle it wherever you spot their colonies. If the powder is messy, mix it with little water to form a paste or dilute to spray and apply around.

    Commercial products

    Chemical bug baits
    Source: cdn.shopify.com

    Mild natural solutions might not work well for a large colony or a severely damp area. For a fast reaction, you should rely on commercial water bug killers easily available in the markets.

    Chemical bug baits

    These baits are bug-attracting pelletsbug-attracting pelletsbug-attracting pelletsbug-attracting pellets, gels, or powders containing sweet luring elements along with toxic insecticides or pesticides to kill the bugs. Make sure you keep the other items out of reach and place the baits in located entry spots or near their nests to ensure the pests find them easily.

    You can use the products having indoxacarb, boric acid, fipronil, or hydramethylnon. These chemicals react with the brain and digestive system of the bugs as soon as they eat them.

    Repellent sprays

    Trapping with edible water bug killers can be slow and ineffective. Sprays are the quickest to cover a large area and react fast. They contain strong acids and toxicants, which attack the lungs and central nervous system as the bugs inhale the spray. Make sure you take proper safety precautions and cover-up to avoid direct contact as the chemicals are dangerous for humans and plants.

    Physical traps

    While all the above methods have the disadvantage that dead bugs and roaches make it a hassle to locate them and clean out, the physical bug traps can avoid this hassle. The traps are either closed boxes or sticky sheets to catch them. You can put any bait on them to attract the bugs, and voila! You can catch them dead or alive without any litter.

    Should you call for extermination services?

    extermination service
    Source: build-review.com

    Exterminators are a sure-shot solution to get rid of bugs and pest infestation. If you find the waterbugs have covered a large area in and around your house or your water bug killers utterly failed, it is better the experts act with the required equipment and treat the issue from the source.

    Exterminators track the bugs using baits and traps to find out their dwelling spots. They use highly potent chemicals and sprays to kill all the bugs. Later they clean the entire place and seal away the leaks, if there are any, thus preventing successive attacks. You can also book for the sanitation drive where they disinfect the surrounding areas around your property to clean the entire place.

    Final Words

    Waterbugs are physically harmless, but they can lead to food contamination and bacterial infection. To get rid of waterbugs and their colonies, it is necessary to approach them with a broad perspective.

    You can use several natural DIY solutions, commercial bug repellents, or hire pest control services. After ensuring the extermination is over, you should maintain dry and clean surroundings to avoid infestation again.

  • How Long Does It Take Grass Seed To Grow From Seed To 2” Tall 2024

    How Long Does It Take Grass Seed To Grow From Seed To 2” Tall 2024

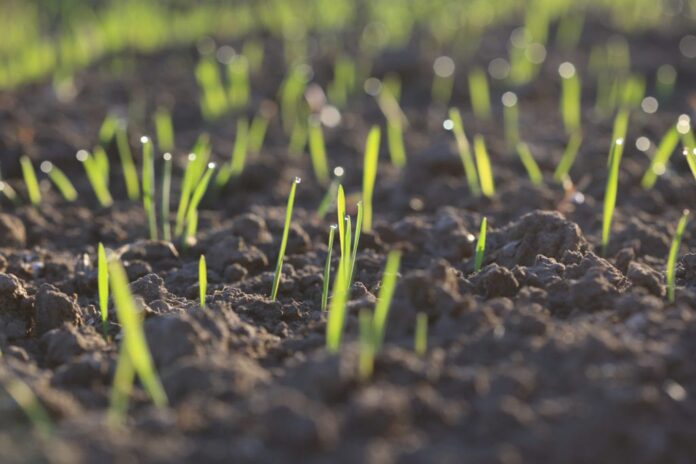
    The germination of seeds is influenced by many factors. It is mostly due to the type of grass variant, climate, the season of the year in which it is planted, moisture of the soil, etc.

    Generally, a grass seed germinates between 5 and 30 days. But, for it to grow about 2 inches tall it will take approximately a month.

    This article will tell you what are all the parameters that influence grass seed germination and growth. We also have some interesting tips and tricks to make sure that your lawn has the perfect and evenly grown green grass.

    Factors that Influence Seed Growth

    Grass Seed
    Source: bobvila.com

    Grass Species or Variant

    Different grass species take different timings to grow. Grass which grows in the colder seasons grows fastest. It is between 10 and 18 degrees Celsius ( 50 to 60 degrees Fahrenheit) that the grass grows fastest.

    In the warmer climatic conditions, Bermuda grass grows the fastest while in cooler temperatures, Ryegrass germinates the fastest. These seeds take at least 7 to 10 days to germinate.

    Ryegrass requires the soil to be damp throughout the germination period, whereas Bermuda grass can be watered once every 3 days even during the hottest seasons. Some meadow grass seeds can take about a couple of weeks to germinate.

    Season of plantation

    Grass Seed
    Source: bobvila.com

    The time of the year during which the seeds are sown plays a major role in the germination and growth of the seeds. There are 2 types of grasses based on the type of season. They are:

    Cool-season grasses:

    These types of seasons are found usually in the Northwest Pacific, Northeast and Upper Midwest, etc. They have an active growth period during early spring and early fall.

    Temperatures ranging from 15 to 24 degrees Celsius are the best for cool-season grasses. They turn brown in the summer though they are green in winters.

    Cool Season Grass-types and their estimated time required to grow:

    • Ryegrass (Annual & Perennial): 7 to 10 days.
    • Tall fescue: 10 to 14 days.
    • Kentucky Bluegrass: 2 to 4 weeks.

    Warm Season Grasses:

    These types of seasons are found usually in the South and Southeast regions. They have an active growth period during mid to late spring and early fall.

    Temperatures ranging from 27 to 35 degrees Celsius are the best for warm-season grasses. They go dormant in the winters.

    Warm Season grass types and their estimated time required to grow are:

    • Bermuda grass: 7 to 10 days
    • Buffalo grass: two weeks to a month.
    • Centipede grass: 14 to 21 days.

    Watering Schedule

    Grass Seed
    Source: heritagelawnskc.com

    Adequate and optimal watering is important for any seed to germinate. If you water too much, it might wash away the seeds, and under-watering dries up the soil. Hence, no germination takes place in both cases.

    Here are a few tips on how and when to water:

    Create a moist environment by watering for several days, and ensure the soil is moist for about 6 to 8 inches deep. This will dampen the soil naturally and make the soil perfect to sow and germinate the seeds.

    Water the soil regularly so that the soil remains wet. Note that you should not water the soil up to soggy conditions.

    Monitor the plants and the amount of sunlight that each region in your lawn receives and water accordingly.

    Once your lawn is set, you will have to water about an inch every week.

    Avoid watering during nights as this can keep the soil wet for longer durations which in turn will promote fungus.

    Watering during the mornings is the best practice as this will not cause the water to evaporate quickly and will give the water plenty of time to percolate.

    Additional Steps

    Your seeds might not germinate even if you follow all the above-mentioned parameters. To ensure that your grass seeds grow nice and green you must follow these additional steps to plant seeds the right way.

    1. Soil Testing

    Grass Seed
    Source: smartnitrogen.com

    Testing your soil is important before growing any plant as this will give you an idea about your soil type. You will know your soil’s nutrient content, water retention capacity, pH, and many other vitals which will give you an idea of which type of grass seed you can grow.

    2. Soil Prep

    After knowing your soil type, you are now ready to analyze and prep your soil.  Till the soil to loosen it up to ensure faster seed germination. You can do it manually or use a rototiller.

    Now, you can add your manure to the soil. Grass would require nitrogen content in greater quantities hence, choose a manure that is rich in nitrogen contents.

    Remove all the unnecessary waste materials, debris, giant rocks, pebbles, stones, and wood as they would hinder the growth. Smoothen and level your surface to have an even and elegant look.

    3. Sowing the Seeds

    Sowing the Seeds
    Source: the-salutation.com
    Grass seedsGrass seedsGrass seedsGrass seeds do not require the actual sowing of seeds. You will have to just spread the seeds evenly. To do so you can either use a spreader that will ease your process or do it manually.

    4. Topdressing

    To lock in soil moisture place a layer of peat moss. This also prevents seeds from getting washed away and protects them from birds eating.

    5. Mowing the grass

    To have a smooth and leveled lawn, you must mow the grass once it reaches the height of about 3 to 4 inches. This makes your lawn look decent and well maintained.

    Final Words

    This article explains to you how different types of grass seeds require different kinds of treatment in order to germinate and grow from seed to 2” tall.  You can now select your perfect grass type for your lawn as you know how much time each variant requires to germinate and grow.

    You are also aware of different parameters and conditions that your seeds should receive in order to grow efficiently. If you are a beginner and are confused then make sure you follow these tips and tricks to have a clear idea on growing your lawn green from scratch. Happy gardening!

  • How To Fertilize Zoysia Grass The Right Way – 2024 Complete Guide

    How To Fertilize Zoysia Grass The Right Way – 2024 Complete Guide

    Zoysia grass originates from Asia and succeeds in warm and humid areas around the globe. Although beautiful, resistant, and low maintenance, it still requires fertilizing it properly throughout the year. It is well worth the time since this species is quite a gem when it comes to decorative lawns.

    It is a perennial cultivar which means it will grow back right after the winter period. This grass is dense, thick, and possesses bright green color, which is something that every lawn enthusiast will absolutely adore.

    To grow it properly, you should know how to fertilize it the right way, and we will try to assist you with that endeavor in this article. In order to do so, we have listed some of the waypoints you should follow.

    Type of fertilizer is important

    Type of fertilizer is important
    Source: thespruce.com

    In order to fertilize the grass, you first must choose the appropriate fertilizer to start with. First of all, it is important that it is nitrogen-based. For 1000 square feet of ground, you will need roughly four pounds of it throughout the year. 

    The ideal mix for this grass should be 15% of nitrogen, always 0% of phosphorus, and between 5 and 10% of potassium since nitrogen is the most important nutrient this cultivar needs. Potassium is extremely valuable since it creates shock and drought resistance over time.

    Zoysia can often lack certain nutrients, which typically occurs when soil is in desperate need of a pH change. The best solutions for this are sulfur and, on some occasions, lime since they are great options to solve pH imbalance.

    It is extremely important to pH test the soil on your lawn since, on some occasions, it can be phosphorus-deficient. The right course of action is to up the dosage of phosphorus in your fertilizer from 0 to 4% and to kick nitrogen up by 1%, while potassium should be on 8%.

    How much fertilizer is correct for Zoysia

    It is important to get the right amount of fertilizer for this cultivar. Adding too much of it can create permanent damage to the plant and cause scorch and burn marks on the leaves. Also, it is very important to stick to the manufacturer’s directions regarding the fertilizer application and the time frames on which you should act. 

    Typically, for this particular species, you should apply up to four pounds of fertilizer three times over the course of a year. You can add different pesticides, pre and post-emergents, and various soul enhancers with any type of fertilizer. You should avoid using fertilizers during stressful times for plants, such as drought seasons.

    How to fertilize it during early and middle of summer

    In the early stages of summer, once the growth of grass initiates, you should start the fertilizing process. Add between ½ and 1 pound of 15-0-15 mixture to your lawn. You should also add some pre-emergent herbicidepre-emergent herbicidepre-emergent herbicidepre-emergent herbicide since it is a great weed and feed product, suitable for the starter growing stage. This will eradicate any weeds that might attack your grass and prevents various problems that can emerge down to the road. 

    After some time, when you have mowed the lawn 5 or 6 times already, it is time to add another dose of fertilizer. This typically takes place during the middle of the summer, and at this point, you should add another ½  or 1 pound. Some weeds might manage to pull through and grow roots, so you should add some post-emergent product that will remove them.

    How to fertilize it during late summer 

    Fertilize Zoysia Grass
    Source: executivelawncare.net

    Late summer is the period when the season is slowly winding down. At this point, you should add the same amount of fertilizer as before. If you notice that the weeds are still there, you should go for another dose of weed and feed product. If that is not the case, adding some pre-emergent herbicides will prevent the weeds from growing in the future.

    How to maintain lawn after you have applied fertilizer

    After you fertilize zoysia grass, it is essential that it gets enough moisture. This applies for any other period, but post-application care demands that you water it regularly. Typically, this species requires somewhere between 1 and 1.25 inches of water throughout the week. It is essential to water the grass after you apply pre-emergent products as well. 

    This is very important since granules must disperse, and it will not be possible if there is not enough moisture. It can also cause damage to the weed and leave burning marks on leaves. It is advised to follow weather forecasts and fertilize the soil before the rain to get the best effect. When the product finally finds its way to the soil it will form a barrier between the plants.

    Moisture is also very important for post-emergent products too. Apply them on moist grass blades for the best effect. This way, granules will stick to the grass’ weeds. These herbicides absorb through the leaves, and this type of application will grant you the best results possible.

    Always stick to the precise measurements manufacturers provide you with. Bear in mind that all fertilizers measurements are calculated for 1000 square feet. If you are uncertain how much you should apply, there are various fertilizer calculator pages on the internet that will help you measure just the right amount for your beautiful lawn.

    Final words

    Zoysia grass is an amazing, slow, and low-growing, sod-forming species. Since it is easy to maintain, it is highly popular. Of course, easygoing care for this cultivar is not the main reason for its popularity. Thick, dense texture alongside full and bright color is what is attracting lawn enthusiasts from all over the world to this grass.

    However, growing and keeping it healthy is not such an easy task. You should be vigilant since various pests can invade it and ruin your hard work. Sometimes, weather conditions might get it, so pay close attention to that factor as well. Either way, it is essential to keep up to date with fertilizing techniques and make your lawn beautiful all year long.

    We hope we managed to resolve some dilemmas you had with this particular type of grass. Read our article carefully, make sure you got measurements right, and create that bright, green lawn that all neighbors will envy!

  • Centipede Grass Pros and Cons 2024 – Complete Guide

    Centipede Grass Pros and Cons 2024 – Complete Guide

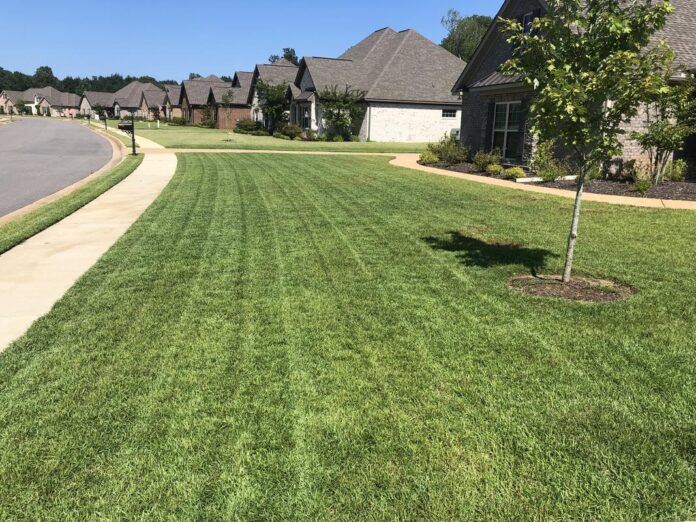
    Centipede grass is an amazing solution for various relatively warm and humid climates. It originated from Asia and was introduced to citizens of the United States during the early twentieth century.

    At that point, decorated lawns became very popular Stateside, and demand for beautiful grasses that require low maintenance was pretty high. Because of that, many people referred to it as “lazy man’s grass.” Although it is pretty easy to grow, it develops really slowly when compared to other similar species.

    As great as it seems, this cultivar comes with various pros and cons. To help you reach a deeper understanding of this plant, we have collected valuable pieces of information related to useful and good properties as much as problematic ones.

    What are the pros of Centipede grass?

    Centipede Grass
    Source: lawnandpetal.com

    With its bright green color and density, this particular grass is a trendy choice for lawn enthusiasts. Even though it does not tolerate cold and frosty weather, it still deals better with it compared to other species of a similar kind. In the section below, we will list some of the good traits centipede grass possesses and the reasons why you should decide to opt for it.

    It requires very low maintenance

    Once this grass grows, it will require only basic care. All you need to do is water it regularly and fertilize the soil. If this cultivar’s climate is suitable, it will easily last for many winters to come. Since it is a slow-growing species, it is not necessary to mow it frequently. The best height for this cultivar is somewhere between 1 ½  up to 2 inches. It requires a low amount of nutrients to remain healthy and keep the right shade of green.

    Weed control is very easy

    You will have fewer weed worries when centipede grass has been established. Its thick and dense growth prevents the growth of various invasive plants and weeds that can damage its health. It will save you a lot of time and effort in weed-killing.

    Since this grass grows really slow, it reduces the chances of thatch buildup. Applying pre-emergent herbicide typically does most of the job regarding weed control, and it is best to do it early in the year. This will easily control winter grassy and broadleaf weeds.

    Centipede grass is extremely light and heat-friendly

    One of the best traits of this cultivar is that it loves the warmest parts of the year. It grows best in areas that have long, warm seasons. It will thrive in full sun and will not change color. All it needs is somewhere between 6 and 7 hours of sunlight.  The soil should be warm and have a temperature of at least 70 degrees for it to start flourishing. It is highly drought-tolerant, so you do not need to worry about grass changing its color as long as you water and maintain it regularly.

    It does not have a true period of dormancy

    Unlike various similar species, centipede grass will stay green throughout the winter months as well. This is pretty uncharacteristic for warm-season types of grass, and it can be a very useful trait if the area where you are planting has mild and brief winters.

    Aggressive growth

    Although it is developing slowly, it grows very aggressively. The result of this type of growth is a beautiful, carpet-like texture that will provide you with a lovely, green lawn with full and strong color. The thickness of this species also limits resources for weeds to take effect, so it is a type of natural defense mechanism.

    It can thrive in acidic and sandy soils

    It is a perfect cultivar for southern climate soils. Warm winters suit this plant best, and every area that has sandy soil is more than welcome for centipede grass. It thrives on high temperatures and recovers from any type of stress quite rapidly.

    What are the cons of centipede grass?

    Centipede Grass
    Source: hancockseed.com

    Even though this plant is low-maintenance and has successful survival in very hot climates, it still isn’t perfect. You should know about several disadvantages before deciding to opt for this choice as your new lawn. In the section below, we have listed some of the cons centipede grass possesses.

    Shade tolerance

    Although this species has a certain tolerance for shades, too much of it may be fatal. If this grass does not get enough sun throughout the day, which is typically somewhere between six or seven hours, it can cause significant damage. It grows best when it is exposed to large amounts of sun, and having a big shade over it each and every day is a big dealbreaker.

    Its surface is soft and delicate

    The delicate surface of this grass might be a big issue, especially if it is planted in high-traffic areas. Being a slow-growing plant, once it is stepped on, it will get damaged and take a lot of time to recover. This is typically a big drawback for people that want to plant it around their household and walk on it.

    Iron Chlorosis is a big threat

    Iron Chlorosis is one of the main reasons centipede grass can suffer from discoloration. Even though it will not affect its health, a color change is a big red light for lawn enthusiasts.

    Iron chlorosis problems tend to develop when you overdo it with fertilizers. Measure them properly because once discoloration sets in, you will not be able to treat it and will have to replace the lawn.

    It requires a lot of water

    Centipede grass requires a huge amount of moisture to keep healthy and have the right shade of green. It is not the biggest trouble you can encounter, but it is still a very important fact to know before opting for this type of grass.

    Typically, it requires roughly an inch of water over the course of the week. If you are growing it in the areas where it does not rain often, you will have to water it regularly.

    This grass is also vulnerable to standing water since it can attract various pests that can damage and kill it. Make sure that the soil you are planting this cultivar is well-draining.

    Final words

    Choosing the proper grass for your decorative lawn is definitely not an easy task. Different types come with different pros and cons that will make you second guess your decisions and confuse you further.

    Centipede grass is an amazing choice for warm and humid areasamazing choice for warm and humid areasamazing choice for warm and humid areasamazing choice for warm and humid areas and an absolute gem for eyes to see in your household, but it has its flaws, and it is significant for you to know about them.

    We hope that our post will solve some of the dilemmas you have regarding this particular species and that it will help you cultivate it with ease and joy.

    Read also: Zoysia Grass Review 

    Don’t miss this amazing offer on Amazon:

  • 9 Best Purple Houseplants For An Exotic Indoor Garden – 2024 Guide

    9 Best Purple Houseplants For An Exotic Indoor Garden – 2024 Guide

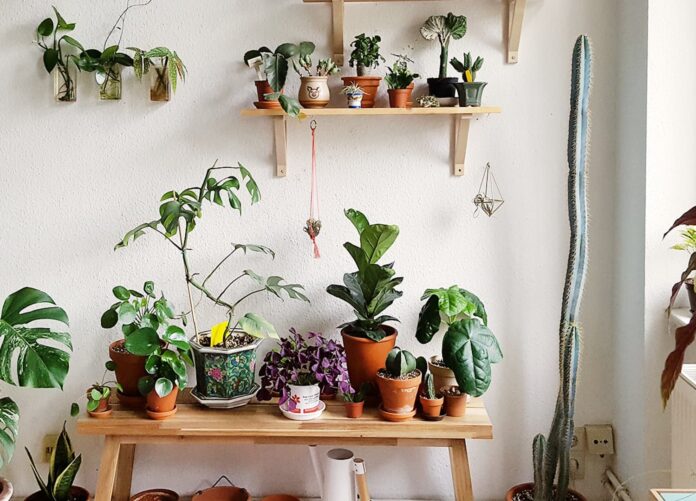
    Gardening can be a stress buster for many of us out there. It is an amazing physical activity that can really ground you to the present and you can just let all your worries melt away working with your little houseplants.

    Especially with the onset of the pandemic, many of us are confined in our homes and gardening has given a way out of our incessant boredom.  If you need a little push to spruce up your indoor garden and give it a little exotic twist with purple hues etched in your leafy friends, we got you covered.

    We have with us a comprehensive list of many purple houseplants for you to choose from and give your garden a makeover. Let’s get into it!

    1. Caladium

    Caladium
    Source: ubuy.co.id

    You can identify this particular plant from a mile away. Resembling an elephant ear, Caladium is sometimes also called the same. Other than that you might also know it as angel wings. This beautiful little plant has large leaves with foliage as thin as a wafer.

    With different interesting patterns, it sure will enhance the look of your garden. Sometimes you may see one even shaped like a heart, arrow, or even a lance. Originating from central and southern parts of America, Caladium comes from the Arum family. It can potentially grow up to 60 cm.

    Be sure to keep the soil moist during its growing season and make sure that it gets 3-4 hours of filtered light in a day. The best temperature for Caladium is 60⁰F during the night while 70⁰ F during the daytime.

    For best results keep the humidity levels at 50 percent or higher. Using well-drained soil with rich organic matter will give your plant the best results. Also, try to apply the 5-10-10 formula during every month of the growing season.

    2. Coleus

    Coleus
    Source: chatelaine.com

    Scientifically known as the Plectranthus Scutellarioides, Coleus is a very beautifully ornamented plant that can be grown indoors as well as outdoors. And if you want a purple houseplant, this might be the one for you.

    Structurally small, you can easily take care of this little beauty. Adoration from visitors is something you should get ready for if you’re bagging this vibrant eye-soothing plant for your house.

    Coleus is essentially a Southeast Asian and Australian-originated plant belonging to the family Lamiaceae. It can potentially grow up to about 36 inches making it one of the petite and cute plants in your garden. Do not forget to water this plant at least once or twice a day during warmer seasons.

    For light, make sure it gets good sunlight and maybe a little shade. The best temperature for this plant would be 70⁰F to 100⁰ F. It requires a moderate to high humidity level, so watch out for that. Your plant needs a liquid fertilizer to boost its growth so make sure to feed it at least once every week for a happy garden.

    For its soiling, do notice if it has a good drainage system and has enough perlite for it. Do not overwater this plant as it might lead to its root start rotting thereby killing your plant eventually.

    3. Iron-Cross Begonia

    Iron-Cross Begonia
    Source: charlie-cook.com

    The next one on our list would have to be Begonia Masoniana. Confused? Well, it is the scientific name of Iron-Cross Begonia. With its wide leaves and darkened hues, it is surely the belle of the ball.

    The name comes from the fact that it looks similar to the German iron cross. The foliage of this particular plant is uneven and pebbled with tints of purple blooming.

    This plant belongs to the family Begoniaceae and originates from China and Vietnam. It can grow up to around 18 inches, so prepare your pots accordingly. This plant has a fungus risk so try to keep the foliage wet. You must water the soil at least once every week.

    Make sure that if you plant an Iron-cross Begonia, it gets bright sunlight but not directly. The best temperature for this plant is around 65⁰F to 75⁰F. With high humidity levels, your plant will grow to its optimum capacity.

    For fertilizing, do it once a month by using the 10-5-5 formula. Make sure that the soil is neutral to acid and alkaline. Do not forget to add perlite for proper drainage. Like many others, this plant is also prone to overwatering which will cause mildew due to its drowned roots.

    4. Ti Plant

    Ti Plant
    Source: pinterest.com

    If you are looking for purple plants, this one delivers you that purple that is why it is on the list. This plant will certainly add a class to your garden that it wanted. With long foliage, you can place this plant in your room for a vibrant appeal.

    There are different varieties of this plant and most of them have the same strappy leaves with very bright shades of purple.

    Ti Plant originates from the Southeastern region of Asia and the Western Pacific Ocean regions. Born in the Asparagaceae family, this plant can grow up to 10 feet. You can decide to water this plant frequently but only in little amounts.

    The best temperature for this plant is around 65⁰F to 95⁰F. Make sure it is placed in a place where it receives partial sunlight and the humidity levels are at 40 percent to 60 percent. You have to feed it high nitrogen for its fertility.

    It thrives under acidic soil so make sure to check the pH of the soil. Do not overwater this plant as you might unintentionally make the leaves drop down. Also, make sure that it doesn’t receive too much sunlight as it will turn a yellow shade from its beautiful purple.

    5. Purple Oxalis

    Purple Oxalis
    Source: royal-bloom.com

    The plant is a full-on purple splash to your garden that you wanted. The scientific name being Oxalis Triangularis, this little leaf-shaped plant looks like a burst of starry purple blossoms. With very delicate foliage the small flowers in this plant make it the perfect decorative choice for your indoor garden.

    You can grow this plant in containers and look at this tiny butterfly-shaped plant come to life. It mostly remains closed during the night but if you put it in partially shaded environments then it will start to open up as you notice.

    Originating from Brazil it comes from the family of Oxalidaceae. Has a potential growth height of around 25 CM making it a very small plant.

    Do put this under a partial shade environment and make sure that it gets a temperature of around 60 degrees to 70 degrees. It thrives under a moderate humidity level. Do try to put mist on the foliage from time to time.

    You can get fertilizer to feed every 2 to 3 weeks and for the soiling make sure you get a very rich soil that has a very well-drained potting mix.

    A few of the problems with this plant are that you might observe powdery mildew and the occurrence of white spots on the leaves that appear due to possible sunburn.

    6. Begonia Maori Haze

    Begonia Maori Haze
    Source: pinterest.com

    Next is this beautiful little number begonia Maori haze that will make your garden pop with the perfect purple. This little plant is also known as begonia Rex be leaf and it doesn’t have a scent of its own. The foliage of this tropical plant is a sight to behold.

    This perennial rhizome originates from Brazil from a family called Begoniaceae. The potential height of 40 to 60 CM this plant is moderately tall. The watering for this plant differs from season to season. During the growing season make sure to water it regularly while during winter reduce the watering.

    Do not put this plant under any direct sunlight but do a mixture so it receives some amount of light during the day. The best temperature for such plants is 72⁰F during the day and at night make sure it receives at least a 64° F temperature.

    The humidity level that it thrives on is higher, so, make sure to mist around the plant frequently. Use fertilizers only during the growing season and as for the soil, this plant prefers a slightly acidic one. Plants of this kind may form powdery mildew which needs to be treated with fungicide.

    7. Echeveria

    Echeveria
    Source: pinterest.com

    From the natives of semi-desert regions, these are flowering plants with a unique design for their leaves. Primarily house plants, these plants are shaped like rose succulents. The leaves of this plant are very fleshy with a waxy texture on the outside.

    Traceback the origin of this plant to Central America from a family of Crassulaceae. It can potentially grow up to 12 inches. That you do not overwater this plant. Watering it once every 10 days works. The plant needs full sun so try to place it in a place where it can get direct sunlight.

    The best temperature for this plant should be a subtropical climate with an average humidity level of 40%. Does not necessarily need a fertilizing portion but if it somehow stops, you can apply a cacti fertilizer.

    The soiling of this plant needs proper drainage so make sure it has perlite and make sure you water it consistently as poor watering may lead to wilting leaves.

    8. Greenovia

    Greenovia
    Source: carousell.sg

    Now if you look at the pictures of this flower, it is guaranteed that you’re gonna want it for your garden. It is a succulent plant shaped like a rose, scientifically known as Greenovia Odrentalis. The leaves have circular petals which are very symmetrical.

    This plant grows in clusters and can be traced back to the Canary Islands. Songs from a family of Crassulaceae are very small given that the potential height is 6 inches. This plant only when the top surface of the soil feels dry which you can make sure of by dipping your finger into the soil.

    Needs a bright sun to grow properly and thrive under a subtropical climate with an average humidity level of 40%. You don’t necessarily need to fertilize this plant. For soiling makes sure it has fast-draining soil which is sandy and has gritty loam.

    Be very careful about overwatering Greenovia as it might lead to yellow leaves. Make your dream of having an exotic garden with this addition.

    9. Wandering Jew

    Wandering Jew
    Source: epicgardening.com

    The last one on our list has to be the Purple striped plant also known as the wandering Jew. Scientifically called tradescantia zebrina, this little plant has very small petals that bloom in violet and white hues.

    If you are bored out of your mind and need something to take care of, this plant will be the perfect addition to your garden as this plant needs a lot of attention during its growing, starting from watering it properly to feeding it regularly.

    What will quickly catch your eye is the silver and olive markings that can be found at the top layer of the leaf and as you go on the underside you see a dark purple color on it. This belongs to a family of Commelinaceae.

    Potential growth height of 6 feet this plant needs regular watering and bright sunlight which is not direct for its growth. The temperature for this will be 50⁰F to 80⁰ F. It requires an average humidity level. You can feed it half-strength liquid fertilizing.

    Make sure that the soil for the pot mixing is moist at all times. Common problems that these little plants face are spider mites, fungus gnats, and aphids. Top searched problems you can use Neem oil.

    Conclusion

    All of these plants will be a beautiful addition to your exotic gardening needs. You cannot just decide to get a plant and forget about it after.

    Plants need proper nurturing to grow properly and if you want a well-maintained garden, make sure to tend to all the needs of different plants that are housed in it.

    With the information provided here, you have nothing to worry about. Hopefully, you have found your rightful match in one of the several that we have on our list. So don’t just sit around and procrastinate and get your plant now! Happy Gardening!